阅读视图
安康·瀛湖
嵌入式博客介绍足迹地图HTML源码
足迹地图可以展示你过去到访过的地方,以及到访地点的介绍与图片记录,图片点击可以放大显示,同时不同地标的半径大小表示了访问该地点的频率高低,如下图所示:
使用DEMO
配置你的足迹数据
其中 /data/config.json 为配置数据,在里面可以配置你的足迹数据,结构如下:
[ { "latLng": [36.44852263442782, 118.73921200195313], "name": "青州", "desc": "我的家乡,山东东方——青州,国家著名旅游城市。\n旅游景点包括云门山、仰天山、驼山、范公亭、青州博物馆、宋城、古街等等。\n著名美食包括弥河银瓜、老槐树煎包、柿饼、马蹄子烧饼等等。", "photos":[ "https://xxxxxxxxxx.com/1.jpg", "https://xxxxxxxxxx.com/2.jpg", "https://xxxxxxxxxx.com/3.jpg", ], "freq": 10 }, ...]latLng: 为足迹的经纬度,可以通过 https://jingweidu.bmcx.com查询得到
name: 足迹地点的名称
desc:足迹地点的描述, \n 为换行符
photos:足迹地点的照片链接,为一组图片 url 数据
freq:足迹地点的到访次数,范围为 [1, 10]
使用配置
将足迹地图内嵌到你博客中的相应位置,示例代码如下:
<iframe scrolling=no style="min-height:480px !important;" src="http://xxxx/xxxx/index.html" width="100%" height="100%"></iframe>
地图样式调整
默认的地图为中国地图,足迹点的样式及背景样式都是固定的,如果想对足迹地图进行进一步的定制化,可以对 /css/index.css 及 /js/index.js 文件进行修改。
其中 /js/jquery-jvectormap-cn-merc-en.js为中国地图,你可以替换为世界地图,具体操作见 https://jvectormap.com
足迹地图依赖的是 JVectorMap,关于基本的样式定义可以参考官网 https://jvectormap.com/documentation/javascript-api/jvm-map
魔改修复版二对应/data/config.json修改示例 :
[
    {
        "latLng": [22.25, 113.56],
        "name": "广东 · 珠海",
        "articleUrl": "https://www.80srz.com/posts/1322.html",
        "desc": "联业织染(联业)有限公司染整废水处理工程- 11/2013",
        "photos":[
            "https://www.shejidaren.com/wp-content/uploads/2024/01/unnamed-file-19.jpg",
            "https://www.shejidaren.com/wp-content/uploads/2024/01/unnamed-file-18.jpg",
            "https://www.shejidaren.com/wp-content/uploads/2024/01/unnamed-file-17.jpg",
            "https://www.shejidaren.com/wp-content/uploads/2024/01/unnamed-file-16.jpg"
        ],
        "freq": 5
    },
    {
        "latLng": [29.10, 117.75],
        "name": "浙江 · 义乌",
        "articleUrl": "https://www.80srz.com/posts/1322.html",
        "desc": "浙江华川实业集团有限公司废水处理系统改造工程 - 8/2015",
        "photos":[
            "https://www.shejidaren.com/wp-content/uploads/2024/01/unnamed-file-18.jpg",
            "https://www.shejidaren.com/wp-content/uploads/2024/01/unnamed-file-17.jpg",
            "https://www.shejidaren.com/wp-content/uploads/2024/01/unnamed-file-16.jpg"
        ],
        "freq": 3
    },
    {
        "latLng": [29.88, 114.30],
        "name": "湖北 · 咸宁",
        "articleUrl": "https://www.80srz.com/posts/1322.html",
        "desc": "武汉汉麻生物科技有限公司废水处理工程 - 4/2016",
        "photos":[
            "https://www.shejidaren.com/wp-content/uploads/2024/01/unnamed-file-17.jpg",
            "https://www.shejidaren.com/wp-content/uploads/2024/01/unnamed-file-16.jpg"
        ],
        "freq": 2
    },
    {
        "latLng": [30.33, 112.24],
        "name": "湖北 · 荆州",
        "articleUrl": "https://www.80srz.com/posts/1322.html",
        "desc": "湖北华丽染料工业有限公司污水处理站 - 6/2016",
        "photos":[
            "https://www.shejidaren.com/wp-content/uploads/2024/01/unnamed-file-16.jpg"
        ],
        "freq": 1
    },
    {
        "latLng": [30.73, 111.31],
        "name": "湖北 · 宜昌",
        "articleUrl": "https://www.80srz.com/posts/1322.html",
        "desc": "湖北鑫物再生纸业有限公司污水处理站 - 10/2016",
        "freq": 1
    },
    {
        "latLng": [37.52, 122.09],
        "name": "山东 · 威海",
        "desc": "荣成市海盛纸业有限公司污水处理厂 - 6/2017",
        "photos":[
            "https://www.shejidaren.com/wp-content/uploads/2024/01/unnamed-file-16.jpg"
        ],
        "freq": 1
    },
    {
        "latLng": [29.20, 119.75],
        "name": "浙江 · 金华",
        "desc": "义乌市义南纸业有限公司新增印染废水好氧处理系统改扩建工程 - 8/2017",
        "freq": 3
    }]
说明:
photos:选填项,可以没有
articleUrl:选填项,可以没有
其他设置同原版
下载后,修改 /data/config.json 文件里的信息,上传到空间的某个子文件夹中,然后引用就可以了。
FORK地址
网页 iframe 嵌入极简播放界面的 bilibili 视频
相关代码
值得一提的是,WordPress 站点可以直接复制链接,粘贴到古腾堡编辑器即可,无需代码模式。
默认代码
<iframe src='//player.bilibili.com/player.html?bvid=BV1y6kvYDE3A&cid=27468235458&p=1&share_source=copy_web' scrolling='no' border='0' frameborder='no' framespacing='0' allowfullscreen='true'></iframe>
极简代码
<iframe src="//bilibili.com/blackboard/html5mobileplayer.html?bvid=BV1y6kvYDE3A&cid=27468235458&p=1&share_source=copy_web" width="800" height="450" scrolling='no' border='0' frameborder='no' framespacing='0' allowfullscreen='true'></iframe>
只需要替换地址并增加两个参数,其中:
原地址:player.bilibili.com/player.html
替换为:bilibili.com/blackboard/html5mobileplayer.html
增加参数1:hideCoverInfo=1 表示隐藏播放量等信息
增加参数2:danmaku=0 表示默认关闭弹幕
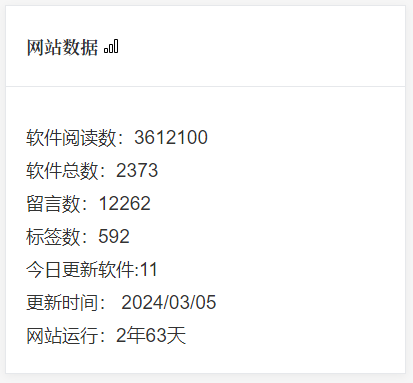
typecho添加了今日更新文章数
在网上搜了一圈貌似没有这样的功能的,就是要统计今天更新或者新增了多少篇文章。
在模板你要放的位置加上以下代码
<?php
$today = date('Y-m-d');
$nextDay = date('Y-m-d', strtotime('+1 day'));

$query = $this->db->select()->from('table.contents')
          ->where('created >= ?', strtotime($today))
          ->where('created < ?', strtotime($nextDay))
          ->where('type = ?', 'post')
          ->where('status = ?', 'publish');

$results = $this->db->fetchAll($query);
$postsToday = count($results);

echo "今天更新的文章数:" . $postsToday;
?>
你以为这就完了?
上面只是最基础的版本
下面是进阶版
打开functions.php 在最后加上下面这一段
function getTodayPostCount() {
    $today = date('Y-m-d');
    $nextDay = date('Y-m-d', strtotime('+1 day'));

    $query = Typecho_Db::get()->select()->from('table.contents')
              ->where('created >= ?', strtotime($today))
              ->where('created < ?', strtotime($nextDay))
              ->where('type = ?', 'post')
              ->where('status = ?', 'publish');

    $results = Typecho_Db::get()->fetchAll($query);
    $postsToday = count($results);

    return $postsToday;
}
然后在你要调用的地方加入 以下代码
<?php echo "今天更新的文章数:" . getTodayPostCount(); ?>
到了这里你以为就完了?当然不是 我还有高级版
还是在functions.php 加入以下代码,记得进阶和高级只能选一个。。。别2段代码都复制进去了
function getTodayPostCount() {
    $cacheFilePath = __DIR__ . '/cache/today_post_count.html';
    $cacheExpire = 3 * 60 * 60; // 3小时有效期

    if (file_exists($cacheFilePath) && time() - filemtime($cacheFilePath) < $cacheExpire) {
        return file_get_contents($cacheFilePath);
    } else {
        $todayPostCount = calculateTodayPostCount(); // 调用之前定义的获取当天文章数的函数

        // 将结果写入缓存文件
        file_put_contents($cacheFilePath, $todayPostCount);

        return $todayPostCount;
    }
}

function calculateTodayPostCount() {
    $today = date('Y-m-d');
    $nextDay = date('Y-m-d', strtotime('+1 day'));

    $query = Typecho_Db::get()->select()->from('table.contents')
              ->where('created >= ?', strtotime($today))
              ->where('created < ?', strtotime($nextDay))
              ->where('type = ?', 'post')
              ->where('status = ?', 'publish');

    $results = Typecho_Db::get()->fetchAll($query);
    $postsToday = count($results);

    return $postsToday;
}
记得在模板所在的文件夹里面建一个cache文件夹。缓存文件就存在这里了
然后在你要调用的地方加入 以下代码
<?php echo "今天更新的文章数:" . getTodayPostCount(); ?>
typecho 调用自定义评论数实现读者墙的效果
效果截图如下
实现代码如下
<style>
.comment-row {
        display: flex;
        flex-wrap: wrap;
        justify-content: flex-start;
        margin-bottom: 10px;  /* 添加这行代码实现上下行间隔 10px,您可以根据需求调整数值 */
    }

.recent-comment img:hover {
        opacity: 1;
    }

.recent-comment img {
    opacity: 0.8;
    transition: opacity 0.3s ease;
    margin-right: 8px;
    margin-bottom: 8px;
    border-radius: 0;
    }
</style>

<?php
$this->widget('Widget_Comments_Recent', 'pageSize=518')->to($comments);
echo '<div class="comment-row">';
while ($comments->next()) {
    echo '<div class="recent-comment">';
    $randomNumber = rand(1, 526);
    echo '<a href="'. $comments->permalink. '" target="_blank" title="'. $comments->text. '"><img src="https://www.jian27.com/img/avatar/'. $randomNumber. '.png" width="25" height="25" alt="'. $comments->text. '" /></a>';
    echo '</div>';
}
echo '</div>';
?>
演示地址
https://www.jian27.com/html/guestbook.html
头像图片地址你们要自己修改成自己的地址。否则用不了
Wordpress插入响应式Bilibili视频代码块
完整代码
<div style="position: relative; width: 100%; height: 0; padding-bottom: 75%;">
    <iframe src="//player.bilibili.com/player.html?aid=206890880&bvid=BV1Ah411z7Po&cid=378344365&page=1" scrolling="no" border="0" frameborder="no" framespacing="0" allowfullscreen="true" style="position:absolute; height: 100%; width: 100%;"> </iframe>
</div>
wordpress6.71后在头部加载了一行css影响文章图片加载的解决
wordpress6.71开始在 wp-inlcudes/media.php 中添加了一段代码
function wp_print_auto_sizes_contain_css_fix(){........导致前端头部自动加载一段css如下,影响了前端文章内页一些用媒体库添加图片到文章的时候,图片变大模糊了;多余的这段代码css如下,也是我们要屏蔽掉他的
//wordpress 6.71 中头部新增的这段代码,影响图片加载需要删除
<style>img:is([sizes="auto" i], [sizes^="auto," i]) { contain-intrinsic-size: 3000px 1500px }</style>
解决方案
在主题function.php 添加一段代码屏蔽掉
function boxemoe_disable_add_auto_sizes( $add_auto_sizes ) {
    return false;
}
add_filter( 'wp_img_tag_add_auto_sizes', 'boxemoe_disable_add_auto_sizes' );
WordPress 前台评论添加“删除”和“标识为垃圾”链接

也就是我在原来的基础上进行了修改调整:
参数调整:
edit_comment_link过滤器的回调函数接受三个参数:$link,$comment_id, 和$status。全局变量使用:确保使用正确的全局变量
$comment和$post。URL 构建:正确构建删除和标识为垃圾的 URL,并使用
esc_url函数来转义 URL。字符串拼接:通过
.=操作符正确地将新的链接追加到现有链接后面。过滤器优先级和参数数量:设置过滤器的优先级为 99,并明确指定接受三个参数。
权限检查:将 current_user_can('moderate_comments', $post->ID) 改为 current_user_can('administrator'),以确保只有管理员才有权限查看这些链接。
功能代码
将下面的代码添加到当前主题的 functions.php 文件即可:
/**
 * WordPress 前台评论添加“删除”和“标识为垃圾”链接(仅限管理员)
 * https://wpexp.cn/731.html
 */
function comment_manage_link($link, $comment_id, $status) {
    global $comment, $post;
    if (current_user_can('administrator')) { // 检查是否为管理员
        $delete_url = admin_url("comment.php?action=cdc&c=" . $comment_id);
        $spam_url = admin_url("comment.php?action=cdc&dt=spam&c=" . $comment_id);

        $link .= ' | <a href="' . esc_url($delete_url) . '" title="' . __('删除评论') . '">删除</a>';
        $link .= ' | <a href="' . esc_url($spam_url) . '" title="' . __('标识为垃圾') . '">标识为垃圾</a>';
    }
    return $link;
}
add_filter('edit_comment_link', 'comment_manage_link', 99, 3);
Linux主机耗子面板
耗子面板是新一代企业级全能服务器运维管理面板。简单轻量,高效运维。
优势
极低占用: 在 Debian 下部署面板 + LNMP 环境,内存占用不到 500 MB,遥遥领先于使用容器化的其他面板。
低破坏性: 面板的设计理念是尽可能减少对系统的额外修改,在同类面板中,我们对系统的修改最少。
追随时代: 面板所有组件均走在时代前沿,更新快,功能强大,安全性有保障。
高效运维: 面板界面简洁,操作简单,无需繁琐的配置,即可快速部署各类环境、调整应用设置。
离线运行: 面板运行可不依赖任何外部服务,您甚至可以在部署完成后停止面板进程,不会对已部署服务造成任何影响。
久经考验: 我们生产环境自 2022 年即开始使用,已稳定运行 2 年无事故。
开源开放: 面板开源,您可以自由修改、审计面板源码,安全性有保障。
UI 截图

运行环境
耗子面板支持 amd64 | arm64 架构下的主流系统,下表中的系统均已测试 LNMP 环境安装。
优先建议使用标注推荐的系统,无特殊情况不建议使用标注不推荐的系统。
不在下表中的其他系统,可自行尝试安装,但不提供技术支持(接受相关 PR 提交)。
系统 版本 备注
AlmaLinux 9 推荐
AlmaLinux 8 不推荐
RockyLinux 9 支持
RockyLinux 8 不推荐
CentOS Stream 9 不推荐
CentOS Stream 8 不推荐
Ubuntu 24 推荐
Ubuntu 22 支持
Debian 12 推荐
Debian 11 支持
OpenCloudOS 9 支持
TencentOS Server 4 支持
TencentOS Server 3.1 不推荐
Alibaba Cloud Linux 3.2 不推荐
Anolis 8 不推荐
openEuler 22 不推荐
随着系统版本的不断更新,我们亦可能会终止部分过于老旧的系统的支持,以保证面板的健壮性。
挂载硬盘
如果您的服务器有未挂载的数据盘,可在安装前以root用户登录服务器运行以下命令自动挂载,面板安装后不支持跨目录迁移。
curl -fsLm 10 -o auto_mount.sh https://dl.cdn.haozi.net/panel/auto_mount.sh && bash auto_mount.sh
安装面板
Warning 安装面板前,您需要了解 LNMP 环境的基本知识,以及如何处理常见的 LNMP 环境问题,我们不建议 0 基础的用户安装和使用耗子面板。
以root用户登录服务器,运行以下命令安装面板:
curl -fsLm 10 -o install.sh https://dl.cdn.haozi.net/panel/install.sh && bash install.sh
卸载面板
优先建议备份数据重装系统,这样可以保证系统纯净。
如果您无法重装系统,请以root用户登录服务器,执行以下命令卸载面板:
curl -fsLm 10 -o uninstall.sh https://dl.cdn.haozi.net/panel/uninstall.sh && bash uninstall.sh
卸载面板前请务必备份好所有数据,提前卸载面板全部应用。卸载后数据将无法恢复!
日常维护
使用panel-cli命令进行日常维护:
panel-cli
地址:
https://github.com/TheTNB/panel
挪车二维码免服务器可微信通知打电话源码

可以部署到cloudflare的wokers,自定义变量phone和wxpusherAppToken、wxpusherUIDs 或者直接在源码修改就行
实现推送到微信
可以绑定一个域名实现cdn加速,把网址转换成二维码,打印即可
也可以把第二个button注释掉,只保留微信通知
使用方法
到这里去申请:https://wxpusher.zjiecode.com/admin
新建一个应用,你会获得一个appToken,再扫码就能获得你的UID,然后把我下面的源码保存为index.html保存到你的网站,再把网站连接制作成二维码,贴你车上就可以了
对了,源码最底下的JS脚本,可以找个在线JS加密的给加下密,这样就可以防小白看到你的appToken了,
最后,如果你的车子有多个人开,可以让他们都扫一下,用小逗号添加在[UID1,UID2]里。
index.htm
<!DOCTYPE html>
<html>
<head>
<meta charset="UTF-8">
<meta name="viewport" content="width=device-width, initial-scale=1.0">
<title>通知车主挪车</title>
<style>
          * { box-sizing: border-box; margin: 0; padding: 0; }
          body { font-family: Arial, sans-serif; display: flex; align-items: center; justify-content: center; height: 100vh; background: #f0f2f5; color: #333; }
          .container { text-align: center; padding: 20px; width: 100%; max-width: 400px; border-radius: 8px; box-shadow: 0 4px 8px rgba(0, 0, 0, 0.2); background: #fff; }
          h1 { font-size: 24px; margin-bottom: 20px; color: #007bff; }
          p { margin-bottom: 20px; font-size: 16px; color: #555; }
          button {
            width: 100%;
            padding: 15px;
            margin: 10px 0;
            font-size: 18px;
            font-weight: bold;
            color: #fff;
            border: none;
            border-radius: 6px;
            cursor: pointer;
            transition: background 0.3s;
          }
          .notify-btn { background: #28a745; }
          .notify-btn:hover { background: #218838; }
          .call-btn { background: #17a2b8; }
          .call-btn:hover { background: #138496; }
        </style>
</head>
<body>
<div>
<h1>通知车主挪车</h1>
<p>如需通知车主,请点击以下按钮</p>
<button onclick="notifyOwner()">通知车主挪车</button>
<button onclick="callOwner()">拨打车主电话</button>
</div>
<script>
function notifyOwner() {
    fetch("https://wxpusher.zjiecode.com/api/send/message", {
        method: "POST",
        headers: {"Content-Type": "application/json"},
        body: JSON.stringify({
            appToken: "AT_uOKPJVyVlxVd************HKaA",
            content: "您好,有人需要您挪车,请及时处理。",
            contentType: 1,
            uids: ["UID_B0GShlS*************Dms","UID_Rh*********B5QK"]
        })
    })
    .then(response => response.json())
    .then(data => {
        if (data.code === 1000) {
            alert("通知已发送!");
        } else {
            alert("通知发送失败,请稍后重试。");
        }
    })
    .catch(error => {
        console.error("Error sending notification:", error);
        alert("通知发送出错,请检查网络连接。");
    });
}

function callOwner() {
    window.location.href = "tel:1318888888";
}
</script>
</body>
</html>
宝塔面板降级版本教程(如9.0.0降版本为8.0.5)
宝塔面板的专业版都到9.2.0了,免费版才到9.0.0。如果遇到宝塔的最新版本有BUG,那么如何降级到低版本呢,这篇笔记就来简单说说。
宝塔服务器面板,一键全能部署及管理 https://www.bt.cn/u/d2y84I
如何降级安装,这里列举从9.0.0版本降级到8.0.5,如果需要其他版本,自己更改版本号即可。脚本如下:
cd /root
mkdir bt
cd bt
# 这里以 8.0.5 版本为例,可以自行更改想降级的版本
wget https://download.bt.cn/install/update/LinuxPanel-8.0.5.zip
unzip LinuxPanel-8.0.5.zip
cd panel/
bash update.sh
之后强制刷新一下面板即可。
小米红米手机刷机玩机工具汇总
一、小米官方BL解锁申请链接(建议到[小米社区]去申请): https://web.vip.miui.com/page/info/mio/mio/testDetails?type=BL_BLOCK&id=-1&fromPathname=mioInternalTest&app_version=dev.220218
二、小米官方解锁工具下载链接: http://www.miui.com/unlock/download.html
三、[小米社区]正式版全机型刷机包汇总链接(链接由社区大佬[云墨清风]维护,大佬社区主页: https://web.vip.miui.com/page/info/mio/mio/homePage?uid=1205154814&fromPathname=mioDetail&app_version=dev.20051 )
⒈正式版全机型刷机包汇主链接: https://xiaomishequ.feishu.cn/sheets/shtcnsRTbwSvpUsaei6B04ogI6Z
⒉正式版全机型刷机包汇总备用链接: https://xiaomishequ.feishu.cn/sheets/shtcnsRTbwSvpUsaei6B04ogI6Z?from=from_copylink
四、Updader App(GitHub 链接)
软件介绍:下载大部分小米、红米机型的卡刷包(可以下载旧版本)
⒈使用指南链接(简体中文): https://github.com/YuKongA/Updater/blob/main/README_CN.md#%E4%BD%BF%E7%94%A8
⒉项目链接: https://github.com/YuKongA/Updater-KMP
⒊下载链接: https://github.com/YuKongA/Updater-KMP/releases
五、第三方收集小米刷机包网站链接
⒈MIUI官方ROM仓库(简体中文): https://roms.miuier.com/zh-cn
⒉小米澎湃OS,现已发布(简体中文): https://hyperos.fans/zh
⒊小米 ROM: https://xiaomirom.com
⒋……
待补中……
六、Root 管理器
⒈Magisk
⑴官方 Magisk(官方面具,GitHub 链接)
项目链接: https://github.com/topjohnwu/Magisk
下载链接: https://github.com/topjohnwu/Magisk/releases
⑵第三方 Magisk alpha(阿尔法面具)App Center下载链接: https://install.appcenter.ms/users/vvb2060/apps/magisk/distribution_groups/public
⑶第三方 Kitsune Magisk(狐狸面具,GitHub 链接)
项目链接: https://github.com/HuskyDG/magisk-files
下载链接: https://github.com/HuskyDG/magisk-files/releases
⒉KernelSU
官网链接(简体中文): https://kernelsu.org/zh_CN
项目链接(GitHub 链接): https://github.com/tiann/KernelSU
下载链接(GitHub 链接): https://github.com/tiann/KernelSU/releases
⒊APatch
官网链接(简体中文): https://apatch.dev/zh_CN
项目链接(GitHub 链接): https://github.com/bmax121/APatch
下载链接(GitHub 链接): https://github.com/bmax121/APatch/releases
4.……
Root 管理器待发现中……
七、柚坛工具箱
(由酷安大佬@暮间雾 开发,相关信息点击此直达链接到大佬帖子查看: https://www.coolapk.com/feed/57736247?shareKey=MmU0OGRlYjhjMjNjNjcwMDVlOWI~&shareUid=27538075&shareFrom=com.coolapk.market_14.5.3 )
官网链接: https://toolbox.uotan.cn
项目链接(GitHub 链接): https://github.com/Uotan-Dev/UotanToolboxNT
下载链接(GitHub 链接): https://github.com/Uotan-Dev/UotanToolboxNT/releases
八、搞机助手
官网链接: https://lsdy.top/gjzs
下载链接: https://lsdy.top/gjzsdownload
九、adb SDK 平台工具版
官网链接(简体中文): https://developer.android.google.cn/tools/releases/platform-tools?hl=zh-cn
下载链接(简体中文): https://developer.android.google.cn/tools/releases/platform-tools?hl=zh-cn#downloads
十、小米社区官网链接: https://www.xiaomi.cn
开源的SSL证书管理工具 帮你申请和自动续期SSL证书

Certimate是什么
Certimate是一款开源的SSL证书管理工具,可以帮助你申请SSL证书,自动续期SSL证书,通过简单的配置即可轻松申请 SSL 证书,并且在证书即将过期时自动续期,无需人工干预,为用户提供一个安全、简便的 SSL 证书管理解决方案。Certimate支持私有部署,而且部署方法简单,只需下载二进制文件并执行即可完成安装。由于是私有部署,所有数据均存储在本地,不会保存在服务商的服务器上,确保数据的安全性。
Certimate项目部署教程
Certimate 是一个开源的 SSL 证书管理工具,具有以下特点:
支持私有部署:部署方法简单,只需下载二进制文件并执行即可完成安装。
数据安全:由于是私有部署,所有数据均存储在本地,不会保存在服务商的服务器上,确保数据的安全性。
操作方便:通过简单的配置即可轻松申请 SSL 证书,并且在证书即将过期时自动续期,无需人工干预。
一、安装
安装 Certimate 非常简单,你可以选择以下方式之一进行安装:
1. 二进制文件
你可以直接从Releases 页下载预先编译好的二进制文件,解压后执行:
./certimate serve
Note
MacOS 在执行二进制文件时会提示:无法打开“certimate”,因为Apple无法检查其是否包含恶意软件。可在系统设置> 隐私与安全性> 安全性 中点击 "仍然允许",然后再次尝试执行二进制文件。
2. Docker 安装
git clone git@github.com:usual2970/certimate.git && cd certimate/docker && docker compose up -d
3. 源代码安装
git clone EMAIL:usual2970/certimate.git
cd certimate
go run main.go serve
二、使用
执行完上述安装操作后,在浏览器中访问 http://127.0.0.1:8090 即可访问 Certimate 管理页面。
用户名:admin@certimate.fun
密码:1234567890

三、概念
Certimate 的工作流程如下:
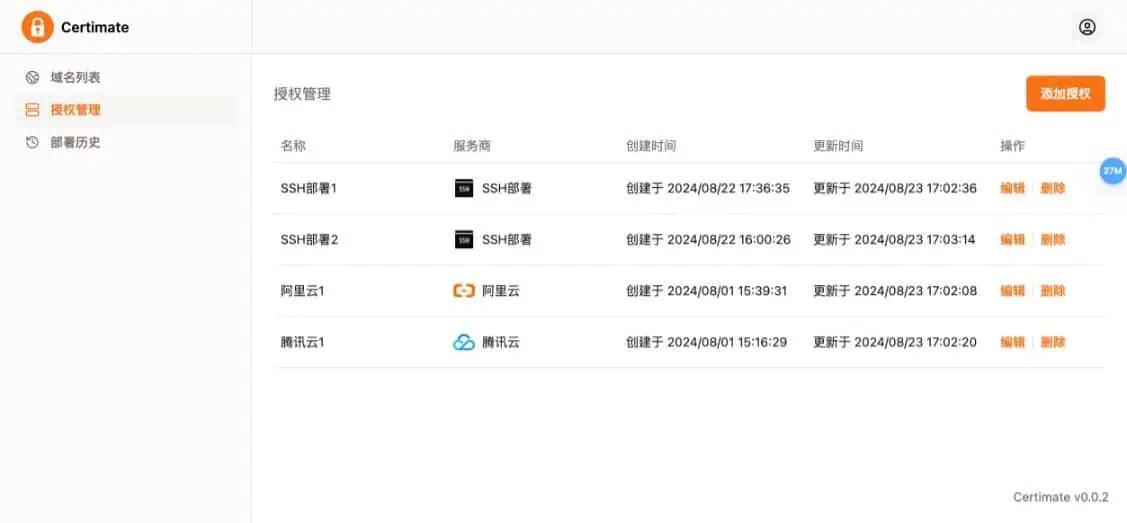
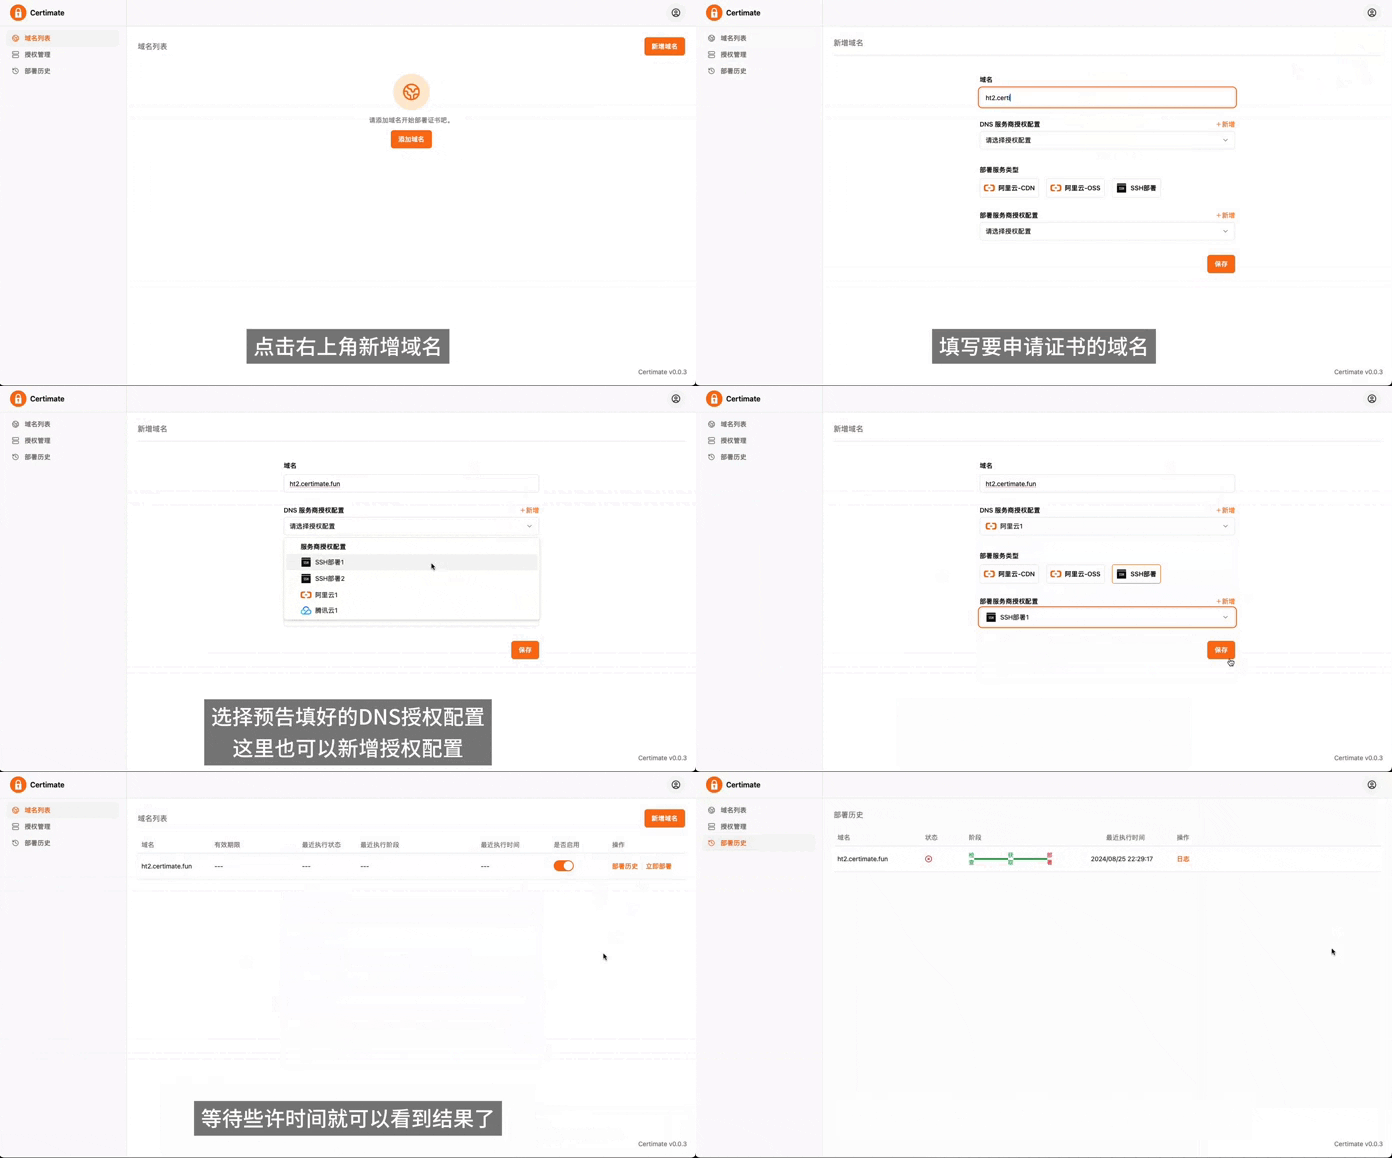
用户通过 Certimate 管理页面填写申请证书的信息,包括域名、dns 服务商的授权信息、以及要部署到的服务商的授权信息。
Certimate 向证书场商的 API 发起申请请求,获取 SSL 证书。
Certimate 存储证书信息,包括证书内容、私钥、证书有效期等,并在证书即将过期时自动续期。
Certimate 向服务商的 API 发起部署请求,将证书部署到服务商的服务器上。
这就涉及域名、dns 服务商的授权信息、部署服务商的授权信息等。
1. 域名
就是要申请证书的域名。
2. dns 服务商授权信息
给域名申请证书需要证明域名是你的,所以我们手动申请证书的时候一般需要在域名服务商的控制台解析记录中添加一个 TXT 记录。
Certimate 会自动添加一个 TXT 记录,你只需要在 Certimate 后台中填写你的域名服务商的授权信息即可。
比如你在阿里云购买的域名,授权信息如下:
accessKeyId: xxx
accessKeySecret: TOKEN
在腾讯云购买的域名,授权信息如下:
secretId: xxx
secretKey: TOKEN
3. 部署服务商授权信息
Certimate 申请证书后,会自动将证书部署到你指定的目标上,比如阿里云 CDN 这时你需要填写阿里云的授权信息。Certimate 会根据你填写的授权信息及域名找到对应的 CDN 服务,并将证书部署到对应的 CDN 服务上。
部署服务商授权信息和 dns 服务商授权信息一致,区别在于 dns 服务商授权信息用于证明域名是你的,部署服务商授权信息用于提供证书部署的授权信息。
利用Vercel搭建各大镜像站
源码介绍

项目:https://github.com/XiaoXinYo/Easy-Reverse-Proxy
Vercel部署
1. Fork项目.
2 . 修改配置.
3. Vercel Import Fork的项目.
4. Vercel Fork项目的Settings-Domains添加域名.
视频教程可查看:https://www.bilibili.com/video/BV1H7YSenEKq/?spm_id_from=333.999.0.0
网站防扒JS代码合集
禁用右键菜单
1、右键无任何反应
第一种
document.oncontextmenu = new Function("return false;");
第二种
document.oncontextmenu = function (event){
if(window.event){
event = window.event;
}try{
var the = event.srcElement;
if (!((the.tagName == "INPUT" && the.type.toLowerCase() == "text") || the.tagName == "TEXTAREA")){
return false;
}
return true;
}catch (e){
return false;
}
}
2.弹窗提示并变成空白页
document.onmousedown = function mdClick(event) {
var e = event || window.event || arguments.callee.caller.arguments[0];
if (e.button == 2 || e.button == 3) {
alert("呵呵");
//不建议用以下方法,易错率大
window.location = 'about: blank';
}
}
禁止F12审查元素
1、按F12无任何反应
document.onkeydown = function(){
if(window.event && window.event.keyCode == 123) {
event.keyCode=0;
event.returnValue=false;
}
if(window.event && window.event.keyCode == 13) {
window.event.keyCode = 505;
}
if(window.event && window.event.keyCode == 8) {
alert(str+"\n请使用Del键进行字符的删除操作!");
window.event.returnValue=false;
}
}
2、按F12弹窗提示
document.onkeydown = function(){
if(window.event && window.event.keyCode == 123) {
alert("F12被禁用");
event.keyCode=0;
event.returnValue=false;
}
if(window.event && window.event.keyCode == 13) {
window.event.keyCode = 505;
}
if(window.event && window.event.keyCode == 8) {
alert(str+"\n请使用Del键进行字符的删除操作!");
window.event.returnValue=false;
}
}
3、按F12空白页
第一种
function mAlert() {
var fn = function () {};
fn.toString = function () {
window.location = 'about: blank';
console.log("呵呵");
}
console.log("%c", fn);//请不要删除这行
};mAlert();
第二种
document.onkeydown = function(){
if(window.event && window.event.keyCode == 123) {
window.location="about:blank"; //将当前窗口跳转置空白页
event.keyCode=0;
event.returnValue=false;
}
if(window.event && window.event.keyCode == 13) {
window.event.keyCode = 505;
}
if(window.event && window.event.keyCode == 8) {
alert(str+"\n请使用Del键进行字符的删除操作!");
window.event.returnValue=false;
}
}
4、按F12关闭当前窗口
document.onkeydown = function(){
if(window.event && window.event.keyCode == 123) {
window.close(); //关闭当前窗口(防抽)
event.keyCode=0;
event.returnValue=false;
}
if(window.event && window.event.keyCode == 13) {
window.event.keyCode = 505;
}
if(window.event && window.event.keyCode == 8) {
alert(str+"\n请使用Del键进行字符的删除操作!");
window.event.returnValue=false;
}
}
禁止复制
document.oncopy = function (event){
if(window.event){
event = window.event;
}try{
var the = event.srcElement;
if(!((the.tagName == "INPUT" && the.type.toLowerCase() == "text") || the.tagName == "TEXTAREA")){
return false;
}
return true;
}catch (e){
return false;
}
}
禁止选中
document.onselectstart = function (event){
if(window.event){
event = window.event;
}try{
var the = event.srcElement;
if (!((the.tagName == "INPUT" && the.type.toLowerCase() == "text") || the.tagName == "TEXTAREA")){
return false;
}
return true;
} catch (e) {
return false;
}
}
禁止Ctrl+S网页另存为
document.onkeydown = function(){
//禁止ctrl+s
if (event.ctrlKey && window.event.keyCode==83){
return false;
}
}
本代码不能100%防止网页被扒


